Showing posts with label crafting. Show all posts

Tuesday, June 11, 2013

Tissue Paper Glass Jar Luminaries

Crafts that allow us to reuse items that would otherwise be recycled or thrown away are a win win in our house.  I like to save glass jars from everyday things we might buy, condiments, sauces, pickles, ect.....you never know when they might come in handy for a craft project on a really hot { or rainy or cold } day.


Tissue Paper Luminaries 

What you will need:

clean and empty glass jars { no labels }
tissue paper { the thin solid color ones work best but they are delicate to work with }
scissors 
mod podge 
containers for tracing if you want to have certain shapes cut out 
Paint brushes { to apply the mod podge }
small candles or tea lights 
lighter { to light your candles }

Step 1:
Pick out your colors and figure out what design you want to have on your jar. 
Cut out the pieces you will need. 

Step 2:
Spread a little bit of mod podge on the jar at a time and place your tissue paper onto it patting it down.  Try not to rub the tissue paper down because this can cause it to tear.  Also, you don't need a ton of mod podge to get the tissue paper to stick down, too much and the tissue paper can tear, wrinkle, or become a squished mess because it will get over saturated. 
Finish applying all of your tissue paper to your jar. 

Step 3:
Allow your jar to dry for about 10 mins or so and then apply mod podge over all of the tissue paper to seal it down.  You want to wait to do this because if the tissue paper gets too saturated with mod podge it can cause it to tear or crinkle on the jar. 

Allow your jars to dry all of the way before handling and placing a tea light into the jar. 


Bonus points to the people who can tell me what character the middle jar is made to look like. ;) 


My daughter loves having her jar in her room at night all aglow.  Like me, she is a lover of candles and candle light. :)

Have left over jars in your home? You can turn them into fun luminaries for every day display or you can make seasonal ones like we did a few Halloweens back: 


Tuesday, May 28, 2013

Stained Glass Art Project {a project for any art lover!}

After a three day long craft fest with my little one, the creative spirit in me feels happy and satisfied .... BUT also itching to do more. ;)  I am hoping to have time this week and the next to share a few of my favorite projects we did.  :)

First up, the faux stained glass art project!


What You Need:

Clear contact paper
Pencil and Eraser 
Black Sharpie Marker 
Colored Pencils 
Scissors
A bowl if you want a round finished product 


These projects are simple and easy, great for sitting at the table and bonding with the kids or for keeping a group of kids busy and having fun. :)

1. Plan out what you want to draw.  If you want a round shape, now is the time to trace the size bowl you want on your contact paper.  
2.  Draw out your drawing using a pencil, keeping in mind that you don't want to press too hard so that the pencil lines {when traced over or erased} don't show through on your finished piece. 
3.  Once your drawing is finished, trace it carefully with a black{or any color of your choosing} permanent sharpie marker. Erase any stray pencil marks.
4.  Color in your drawing with colored pencils.  Keep in mind the colors do look lighter when the finished product is placed in the window.  So if you want your colors as vibrant as possible, its best to press kinda hard. ;)
5.  Once you are finished with your drawing, cut it out and carefully place it onto your window.  I found the best way to do this was to peel from the top and once I had a small section peeled away I placed that onto the window, smoothed it down and then slowly peeled more off....smoothing it down as I went. 


Depending on the time of day and/or how the sun hits it, the colors in your project will be more vibrant or faded.  I love the way the look in the windows and the extra personal touch they bring to a room.  My daughter's owl one makes me smile .....I know its hard to see in the photos but she used multiple colors in each section to blend them to get her colors "just right and more fancy".  I love watching her inner artist bloom and her creativity blossom.  

I have a feeling that by the end of the summer, most of the windows in my house will have one of these on them. :)


Tuesday, May 21, 2013

Easy Fabric Headbands

When summer weather begins so does the daily headband wearing in our house.  My daughter loves headbands, but finds a lot of the hard headbands difficult to wear because they bump her glasses and bother her.  Our solution was tons of crochet headbands with flowers and hearts.  

This year I wanted to mix it up and do something different for her so I went in search of a quick and easy fabric headband tutorial on pinterest so that I could whip up a bunch of new hair accessories for my little headband lover. 


Easiest Fabric Headband I've Ever Made!


Full tutorial can be found here.

The fat quarter bundles that you can get at Joann's are perfect for these because the length on one side is just what you need to whip these up.  I cut the width of mine at 4 inches instead of the called for 3.5 inches because I wanted a wider headband.  I also just did a double fold over for the ends that go around the pony tail holder instead of the pointed end because I liked that look better. To make it fit my 10 year old's head I just made the fold overs a bit wider than the adult version. You could also take off an inch or half an inch to adjust the size accordingly. With the pony tails at the join, these headbands have a great stretch to them.
Love the finished headbands! They are super easy to sew up and would make awesome gifts or party favors. :)


Sunday, November 11, 2012

How to Make Tea Cup Candles

I think I have pretty much established the fact that my life lately has been very busy.
 With that being said, I don't consistently blog like I would like to. 
So my new plan for this blog:

Blog when I can, when I have something I want to share and have time to share.  
My life is filled with homeschooling, crafting, homemaking, dancing for my ballerina....the list goes on and on.  I would love to have the time to share all of our crafts, projects, crochet patterns and homeschool goodies and maybe one day I will have more time, but for now I have to settle on posting when I have the time.  I kinda like that, the no pressure blogging, blog when I can, with no promises to have new content daily like so many of the other fabulous blog I read when I have some free time and need inspiration. 

On to the crafting! 

So, I love tea cups; one day I hope to have an amazing vintage collection of them in my home on display on open shelves for me to admire when I am cooking. :)

While surfing pinterest I found some great tutorials on how to make tea cup candles and I knew as soon as I saw them, I had to make some of my own. :)


This was my first batch of them and I love them.  They look so pretty glowing in the dark. 

I was lucky to get a beautiful batch of vintage cups from a family member and now I can't wait to go out to the thrift store and pick up some more of these to make them as gifts for this holiday season. :)

Tip that I found useful in my first batch: 

You need a lot of essential oils if you plan on using that for the scent, so do one candle at first {I know this sounds like a pain but trust me it will pay off} and then once its hardened test it by burning it and see if the scent is as strong as you like.  If you can barely smell it like what happened to my first one that was my tester, double or triple the amount of essential oil drops in the wax per candle. 

I bought soy wax from a local craft store but you could melt down old candles or use other candle wax if you prefer. 

Here are the two tutorials I used to make my candles :

http://www.gomakeme.com/2012/02/go-make-me-soy-candles-diy-project.html

&

http://georgicapond.blogspot.com/p/candle-craft-project.html

They just make me smile because its something fun, different and whimsical. 
And I love tea cups so tea cup anything is def. my cup of tea! ;)


Tuesday, July 3, 2012

Instagram Love {Tutorial}

Recently I may have become slightly okay majorly addicted to instagram photos.  But in my defense how could you not?! They create such cute photos and are so much fun! :)  With many adorable photos on my phone I was pretty keen to get them into prints so I could display them around my house.

I used the app from postal pix to order my instagram photo prints right from my phone.  The app is free and very easy to use/navigate.  It guides you through the order process and you order the photos straight from your camera roll on your phone.  My photos came in two business days after I ordered them, fast and great service all is one is a win, win for me. :)  You can check them out on facebook here.


This is the only place I found that got amazing reviews and would print my instagram photos in true instagram  fashion ie in the square form. :)  Now I will add in one little note about the photo quality:  The photos look awesome and I love them, but there were two that came out slightly not clear in print form.  This didn't bother me at all because if I look at the photos on my phone the way the filter is applied it is not crisp.  Be mindful of the photos you print if you want all crisp looking photos because the different instagram filters will give you different photo results. I love it and love the different variety in my photos when they are displayed. 

I found lots of inspiration for cute ways to hang the photos but I was looking for something simple for my daughter's room.  I plan on making something cool for our family room but for my daughter's room I wanted something that was easy for her to use and fun.  


This is a simple to do project that you can change up very easily....use ribbon, lace, braided yarn, hemp, cording......lots of possibilities here.  My daughter loves tulle and wanted the photos on her door so this display method was the perfect solution. :)

~~Just to add in, yes you can still close the door with the tulle wrapped around it like this.  I don't know how other materials would effect that.  The tulle for us does not effect the door closing one bit. 


All you need is tulle rolls in your favorite colors, clothespins, and scissors.  I did use some clothespins in her display that I had used mod podge to apply scrap booking paper too.  That is an easy way to decorate your clothespins to give it an extra fun touch. 


Cut a really long piece of tulle.....you want to have enough so that you can keep wrapping it around your door.  

Use the tulle and wrap it around your door, feeding it through the gap in between the door and the jam.  It does take some time to do this, its faster if you have someone helping you out.  You will leave a two foot section at the beginning so that you can tie it off when you are finished.  If you have someone helping you they can hold on to this section to keep it there, otherwise use a small piece of tape to tape it to the door to hold it in place.  When you get to the end of your tulle use the two ends to tie the tulle into a bow to secure it to the door.  While wrapping it you want to do it tight but not too tight that you rip the tulle.  You just want it to be tight enough that it stays in place on the door. 

Use the clothespins to hang your photos and you are finished!  Quick and easy, not to mention fun and a low cost way to hang all your awesome photos.  You could even use this method to display your child's art on the door as well.  :) 

Now I just need to finish up a few more crochet flowers to be pinned to her door and it will be perfect according to little miss. :) 

I am linking up to Frontier Dreams Keep Calm Craft On today, head on over there to see some more awesome creative people. :)

Thursday, May 17, 2012

Faking Floating Balloons

Earlier this week I did a post about the bear I crocheted for my daughter...which has been going just about everywhere with her these days. :)


Since she loved this bear so much I decided to use it to tell her that she had made the ballet team {and which one} when I got her results. See original bear post here. I had to bear~nap her little Veronica while my daughter was fast asleep to make this possible, which was kinda hard because she picked that night to have her in bed with her.  Thankfully I have some sneaky ninja skills and was able to get her out undetected ;)

I cut out little circles to make the banner that said Mini on it.  Then I tapped the circles to a piece of pink yarn and then wrapped each side around the bear's paws to keep the banner in place. 


This next part is the part I had a feeling Little Miss might have a problem with. 

First:  I cut out the balloons and then tapped them together using tape on the backs. 

Next:  I wrote congrats on the top balloon and then tapped the yarn that would be the balloon strings to the back of  the balloons so that it would look like they were hanging down lined up with the balloons. 
You can also add on a little bow to hold the three strings together to make it look more fancy. :)

Finally:  {The step that might not go over so well! lol} I taped a yarn needle to the back of the balloons at an angle so that when I stuck the pointy end into the bear's head {gasp,  I know!!} they would have a good angle on them to look like they were floating next to the bear's head.  This step def. takes some playing around to get it just right.  


While Victoria was not overly thrilled with how I did the fake floating balloons thing she did say that it was super cool just don't stick anything into her bear's head next time. ;) lol 


After taking her bear out of harm's way she took the cute little decorations and put them onto her picture frame of one of her ballet pictures from the fall. I told her her room was busy! lol  She loves having a lot of colorful stuff all over and just the right amount of vintage or handmade pieces with lots and lots of books and art. :)

Hopefully everyone is having a great week.  The AG Shawl/Wrap pattern will be posted this week in case anyone was wondering. :)


Tuesday, May 15, 2012

Keep Calm Crafting On Tuesdays

I feel like the last two weeks have been kind of a blur for me with so much going on and so much to do.  Hoping after my daughter's big ninth birthday things will calm down a bit.  I am keeping busy working up some special homemade gifts for her for her big day, she picked out some really cute things this year. :)

I just finished a new pattern for an American Girl shawl/wrap for her:


I will be posting this pattern sometime this week.  It was inspired by the wrap I am making myself that my daughter keeps saying that she loves so much. 


Pattern notes for the adult version can be found on my Ravelry page here. 


I just finished working up a newborn version of my Little Girl Tiara for a sweet lady who messaged me on Ravelry.  Sadly, I don't have a cute little newborn to try it on, so one of my daughter's little baby dolls is the best I could do. :)


My pattern for the newborn tiara can be found here. 

Still lots more to work up for my little miss.... skirts, a mini unicorn, headbands for her AG dolls, and I am going to try {key word being try ;) } to start a matching wrap for her to match her AG doll.  I know I won't be able to finish that in time for her big day but she loves when I start new projects for her so the thrill of knowing something new is coming soon will def. make her happy. :)

Linking up today at Frontier Dreams Keep Calm Craft On.   :)


Tuesday, May 1, 2012

Easy Handmade Mother's/Father's Day Gift Tutorial

If you've been following my blog for awhile, most of you know that I am big on handmade gifts for the holidays.  I not only love creating them, I also love seeing someone's face when they get a handmade gift.  Its priceless. :)

In our house my husband always tells me its hard when it comes to holidays because I am such a crafty person and will usually just make what I want/like/need ect on my own.  He too is into the handmade stuff but says he is no where near as crafty as me.  I figure there are some other husbands out there in his boat who would love to create something special and personal for their mom or to help their kids make something for their wife....ect so I thought I would post a quick and easy handmade gift that even the proclaimed "not crafty people" can do. :)  

This is a work in progress....still tweaking it to get it just right but that is what is so great about this, you can take this simple idea and add to it to fit the person you are making it for.  What I love about this project is not only how easy and heartfelt it is but how you can customize it for anyone....a mom, dad, grandma, grandpa...ect all depending on the photo, quote and embellishments used. 


What will you need for this project? 

A photo of your choosing

Frame that has matting 

Lace or embellishments 

Sharpie Ultra Fine Point Permanent Marker 

An awesome poem or quote that you feel speaks to that person, you can write it yourself or surf the interwebs for a great one. :)


This is the photo I started out with ....I love this shot I captured of the two of them walking along the path in the park sharing a moment together. 


Stick it into your frame to make sure you like the contrast of the photo and the frame.  I picked a frame that would bring out the colors in the photo.  Sorry about the glare, I didn't push all the back pegs down so its not totally secure in the frame. :)


Write your quote on the matting and then add some embellishments and you are done! 

The poem I used was written by my husband, you can use it if you want but it is copywrited to him, being the writer of the piece.  So if you use it, please link it back to my blog and give him credit. :)

Here is the poem he wrote:
"As I hold her hand and guide her down the narrow, beaten path through life, I begin to realize, I've been here once before.  Only then, I was the one being guided.  Then suddenly it hits me, I too will someday have to let go." ~ G.F.

Now, what changes am I going to make to make this wip a finished product? 

For starters I am going to have my husband re write the poem on the matting because I am not too keen on my handwriting.  Thankfully I have an extra matting! :) 

I might add in a flower in the bottom corner or something else...not sure yet.  

I will def. keep the lace and will trim it and mount it on the matting so it looks beautiful and put together. 


Mother's Day is fast approaching, hopefully you guys are having fun creating beautiful projects for the special people in your life!  I would love to see your finished or wip Mother's day ideas, feel free to link those in the comments so I and others can check them out! :) 

Linking this project to Frontier Dreams Keep Calm Craft On


Monday, January 16, 2012

How to: Vintage Wooden Hanger Jewelry Display


True to my love affair with all things vintage and eco my husband and I made a jewelry display that takes both of my loves and puts them together into one awesome piece.  I was even able to add in a little crochet....if I was feeling better today I think I would have done a happy dance. :)

For this project you will need:

A wooden hanger
A drill with a small drill bit {a little smaller than the hooks that screw in}
A package of 7/8" cup hooks {you won't use them all}
A nail for hanging
 Pretty jewelry ;)
Any other embellishments you might like
With a pencil mark the spots on the hanger where you want your hooks to go.  We did ours about an inch apart and then left an inch and a half on each end.
Drill into your hanger about halfway through at the spots that you marked.
Screw in your cup hooks.
And you are finished! Its so totally easy :)
Photo done by Victoria, she thought it was so cool that the hooks made little hearts when put together. :)
I crocheted a flower and then sewed a vintage button in the middle.  I didn't sew it super tight, I did it so that I could slip a nail underneath it.
Then I took the nail I was going to use to hang it and put it threw the middle of my flower by going under the button.  This hides your nail head fabulously. :)
I'm in love, its so simple and so me.  Vintage goodness, eco goodness via re~purposing, with some crochet and fun.  Love, Love, Love it! <3
Its hanging in my bathroom {too keep the kitties away} and it just makes me smile.  I put some of my favorite piece on here to start with, I might make a second one because I have a lot of favorites.  The cameo that my husband found the charm and necklace for at different times and gave to me to make a special necklace, the awesome piece one of my BFF's made me, vintage goodies from one of my favorite people {she is like a mom to me!} and then a few necklaces that I made.
I bought a bundle of hangers and have a few left over.  I was going to list them on my etsy store but thought I would put them for sale on my blog first.  If you're interested in one of these jewelry displays, send me an email at createbellacreate{at}gmail{dot}com for details.   :)
Other goodies from thrifting:
This cool piece needs to be cleaned up and treated with some oil to bring it back into a great condition.  Once we are done with that, it will go in our hall bath as a hanging storage cabinet.
Unique vintage storage for 20 bucks?  I'm thrilled! :)
Victoria even picked out a piece for her dolls.
This piece was really heavy! Real wood and not sure what the metal was, but it was heavy! Victoria fell in love with this at sight.  Since we got home today she has been using it for her Monster dolls and her American Girl dolls as well.  I love that Victoria loves to thrift shop for vintage goodies as much as me.  Although the place we went to today was very large and by the end she was tired.  But when I asked her if she wanted to go back she was quite keen to go. :)
The monster dolls, Victoria loves these things!    She must have a thing for this type of stuff because she also loves Abby on NCIS.  She thinks she is awesome. :)
Tomorrow I am going to do a post for homeschooling: The Periodic Table Activity
We had such a good time with this one, I think if I had projects like this in school growing up I might have enjoyed learning about the elements more. :)

Tutorial: Upcycle a Vintage Dish into a Dish Stand


I love thrift store shopping...looking at all the vintage and retro pieces just makes me smile.  Sometimes I wonder if I was born in the wrong time period because I love that stuff so much. ;)
Christmas weekend we saw lots of family and my wonderful Aunt showed me the cake stands she was making with vintage dishes.  They were adorable and so unique looking and I loved them as soon as I saw them.  This weekend when I went thrift store shopping I had that piece that she had made in the back of my mind.  While looking at all the goodies {and hoping to find unique pieces to make my own dish stands} I found this beauty:


I love the detail work and how unique this piece is.  I have seen things like this on the web and on pinterest while looking for vintage pieces and was so excited when I found a beauty of my own! :)
My luck continued because I found the perfect dishes to use to make my dish stands and unique pieces to use for the stand parts as well.  I was so excited to go home and make my dish stands ....the whole time we finished running around I was thinking about my dish stands and how they were going to look.  ;)

What you need for this project:

Dishes {plates or bowls or even cups would work}
Sturdy pieces to use for your stands
E6000 Glue or similar Glue
Optional: Q ~ Tips for spreading the glue
Books to place onto your stand to hold the pieces together while they are drying.

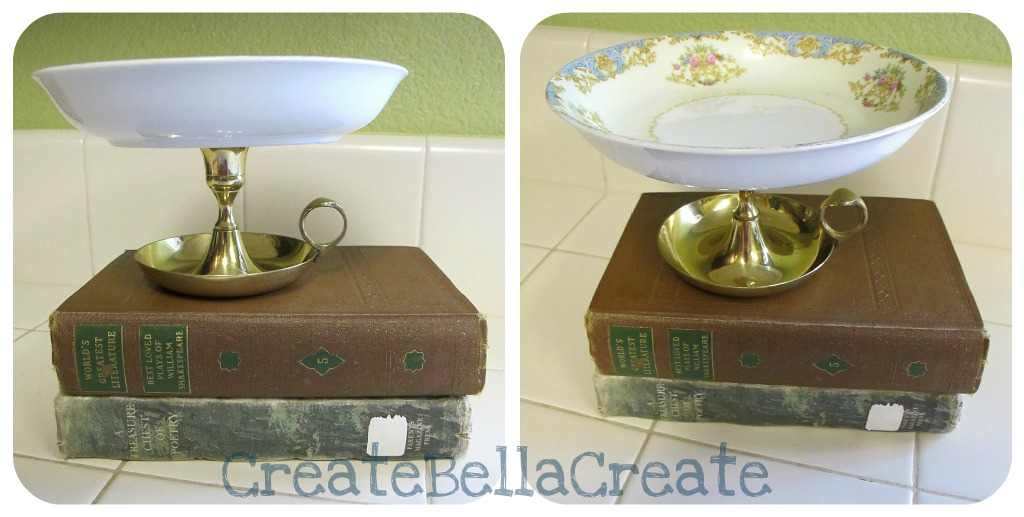
Grab your plates and stands and lay them out on the table so you can decide how you want them to look.  I have three of  the same dishes this time around so I didn't have to think much about it.  But if you have different dishes this is the time to place them on the stands and find that perfect fit.
The dishes I got have a nice flat area in the middle and they also have a  lip to keep things in.   For my stands I found two old school candle holders and another stand that was meant for candles.  My husband just took off the middle point piece that was meant to go into a candle to hold it steady on the holder.  If you see cool pieces always look to see if you can change something about the piece to make a new use for it. :)

Put your dish upside down.  Apply your glue to the edge of the piece{the part that will touch your dish when the dish is resting on it} you are using for your stand with a q~tip.

Place the stand onto the dish and use gentle pressure to push the stand to the dish.  Place a book or two {not to heavy because you don't want to break your dish} onto the bottom of the stand to hold the two pieces together while the glue dries.

I didn't take photos of this part because I didn't want to risk getting that nasty glue on my camera. ;)
After you do all of your dishes and they are mostly dry.  Transfer them carefully to the garage, still upside down to dry.  The glue kinda smells so I like to let the pieces dry outside. :)
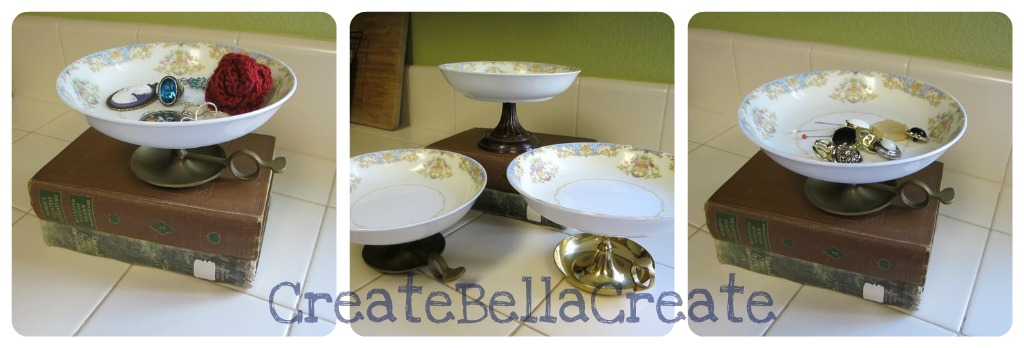
I can't wait to give two of these as gifts.  I just love how they came out! :)
You can use them for so many things....
to hold your jewelry
to hold your sewing stuff while sewing
to hold your sponges by your sink
to hold a candle
so many possibilities!
I plan to use mine for my jewelry in the bathroom.  That way I can place my jewelry in there before cleaning up. You could also put it by your kitchen sink and place your jewelry in there before washing dishes to keep your jewelry nice and clean. :)
Hoping everyone has a wonderful new years weekend!

Covered Composition Notebook Tutorial


I love the look of covered notebooks.  They make the classic composition notebooks look so much cooler. :)  We use composition notebooks in our house for schooling a lot...science, history, journals. ect.  Sometimes I will cover them in brown paper in the old textbook cover way so that my daughter can draw all over the front of it.  Today we decided to beautify our new science composition notebook with some pretty vintage inspired scrapbook paper.
For this project you will need:
A composition notebook or journal
mod podge or some good glue
pencil
ribbon
hot glue gun and hot glue
scissors 
 You will trace the front cover of your notebook onto the scrapbook paper of your choice and then cut it out.  I did another small piece and cut the end with scallop scissors just to give it a fun touch. 
Use mod podge or glue to glue your paper down, be sure to smooth it down nice and slow as you put the paper down to avoid air bubbles.  I like to put the mod podge all over the front cover and then lay my paper down nice and slow. 
We put a thin coat of mod podge over the paper once it dried.  You don't have to do this but since I know it will get a lot of use I thought adding an extra sealer would be a good idea. :)  
Cut your ribbon to size, leaving an inch on each side to fold over to the inside of the notebook.  Hot glue the ribbon down and then turn your notebook over so you are looking at the inside.  Hot glue the little one inch tabs to the inside cover to secure your ribbon down. 
Victoria's finished notebook! I didn't like the way the photo came out inside ...the lighting in my house drives me nuts! lol 
That's better! Love the colors and the purple ribbon my daughter picked. :)
Showing off her new science notebook. 
Excited? Silly?  Not sure what, but its super cute. :)
She loves blank pages in a notebook....I think its the joy of filling them in. 
This project is super easy and fun to do.  It took my daughter and I about an hour to do it, including drying time.  I let her do a lot of the work.  She loves creating things and putting her own touch on things that she is going to use.  I think its really rewarding for her and I know its priceless for me to watch. :)