Showing posts with label free crochet pattern. Show all posts

Friday, May 31, 2013

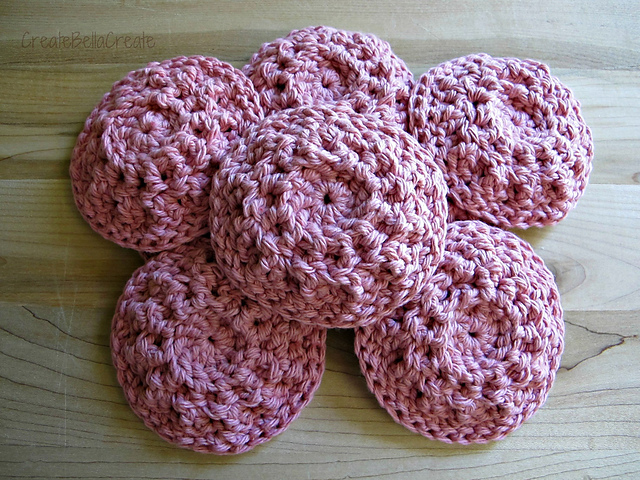
End of the year Teacher Gift {Face Scrubbies}

Are you a crochet lover { and possible addict ;) } looking for a quick and easy teacher gift for end of the year?  I have the perfect gift that works up fast and easy and also uses minimal yarn.


A set of handmade all cotton face scrubbies that are fabulous to use and eco friendly too! :)
{Scroll down for pattern link}

I have made two sets for myself and multiple sets as gifts and everyone always loves them.  They are great for washing your face in the morning or cleaning make up off your face at night.  Throw them in the washing machine with your towels {I throw my in the sanitary setting on my front loader with my towels} and then you can lay them flat to dry or throw them in with another load to dry {I always throw them in on the delicate cycle to avoid shrinking}.  They do curl up a bit after washing but as soon as you get them wet they are flat and back to their normal size and shape.


The texture is fabulous on these, one side is more bumpy than the other, so depending on what kind of texture you are looking for you have two options with these. 


Sorry for all the photos....
I am in love with this sea foam green color, it looks even more fab in person too! 
I want to paint a room in my house this color...or maybe just buy a dress in it. ;) 

The pattern is available for free on Ravelry here and if you want my notes with the yarn info you can see that here

I like to keep my packaging simple and sweet, use some vintage lace to tie them up in a cute little bundle and add a card to your shop or a sweet little note.  These beauties are bound to be loved for many months to come and mother earth will thank you for helping to keep the planet a little more green. :)


Tuesday, June 19, 2012

Free Shell Crochet Headband Pattern


I'm excited to be sharing another crochet pattern....it feels like its been forever since I have done that.  Lately all I have had is dance on the brain with all these extra practices and shows for my daughter. 


I found this shell headband a few weeks back and I loved how adorable and simple it was. The only issue I had with it was that it didn't tie in the back.  Its been our experience that if crocheted headbands don't tie in the back they get stretched out and don't fit right after awhile. Since my daughter wears headbands daily that just wouldn't work for us.  So, I modified her shell pattern and turned it into a version that will tie in the back, perfect for a headband addict like my daughter. :)

Shell Headband That Ties in the Back 


What you will Need
Small amount of yarn {I used Naturally Caron Spa}
4.00 hook 
Yarn needle for weaving in ends

US Crochet Terms 
chain {ch}
skip {sk}
single crochet {sc}
double Crochet {dc}


ch 136 

sc in the second ch from your hook 
sc for 38 more

Start Shell Pattern: * slip stitch, sk 1, 5 dc in next, sk 1 *
Repeat that pattern 13 more times for a total of 14 shells 

Work 1 slip stitch after the last sk 1 of your 14th shell 

sc to the end. 
Cut your yarn, secure your end so you can weave it in later. 


Its going to look like the photo above right now.  


Take your 4.00 hook and your same yarn and join with a slip stitch into the last slip stitch that you worked after your sk 1 on the 14th shell.  See photo above. 

sk 1 and work 5 dc into the same place you worked 5 dc for the other side. 
sk 1 

Work the same pattern you did on the other side on this side, placing the slip stitches where there are slip stitches from the other side and the 5 dc cluster where the 5 dc clusters are on the other side.  This way they will all match up. 

You will end with a slip stitch in the slip stitch that was the first one of the other side that started the 14 shell pattern.  

Secure all of your yarn ends and weave them in.  

Attach a bow, flower, heart, whatever you fancy and you are set! 


I have been busy making quite a few of these for birthday party favors as well as for gifts.  They work up so fast and easy and go great with a big flower. :)

Flower pattern can be found here.

I am also working on hats for Christmas/birthday gifts right now and still working on my scarf/wrap.  Can't wait to finish that one up! :)

I am linking this up to Frontier Dreams Keep Calm Craft On, head on over there to see some more awesome crafting goodness.  


Thursday, June 14, 2012

Crocheted Owl & A Mini Crocheted Headband Pattern

For my daughter's ninth birthday I thought I would try my hand at another amigurumi pattern because the little bear was such a hit with her. 


The owl pattern can be found here. 

I did make an adjustment to the pattern with the way I did the beak.  
I just worked up two small crocheted triangles with a 3.00 hook and then I sewed them on with the long flat ends right next to each other so that it looked like an open beak.  I thought that would be a fun whimsical touch.  :)

To create the girly headband: 

You will need a 3.00 or 3.25 hook 
Small amount of yarn
Yarn needle 

US Crochet Terms
Chain {ch}
Single Crochet {sc} 
Slip Stitch {sl st}

Ch 20 - 30 depending on how big {from side to side} you want your bow. 

Being careful not to twist your yarn join into a circle with a slip stitch. 

~~ If you wanted a bigger bow or if you were making this for a different sized doll or stuffed animal you could always adjust your hook size accordingly or add more chains.  The number of chains does not matter with this pattern. ~~

Round 1
ch 1 and sc in the ch 1 stitch space 
sc around and join with a slip stitch in the 1st sc of the round. 

Rounds 2 - 4
Repeat round 1 

You could keep going if you wanted it taller, its all on personal preference. :)

When you are happy with the size you will cut your yarn leaving a long tail.  

Secure the yarn from the beginning when you started and weave that yarn piece in.  

Take the yarn you want to use for the headband part and make a long chain that will wrap around your doll/animal's head with enough left over to tie into a bow in the back.  Knot the yarn at both ends and snip your yarn ends short.  I like to put a little fabric glue on the ends of this so that they don't fray or get all fuzzy looking. 

Then pinch your bow in the middle  and take your long yarn tail and wrap it around and around the middle of the bow making sure it is snug so it gives it that pinched in the middle bow look.  

When you are happy with the way the middle looks, take your yarn and wrap it around two more times making sure you wrap it around your headband where you would like it placed as well.  

Using your yarn needle, knot your yarn around the wrapped around yarn in the back and weave it in to secure it in place.  You will be able to slide the bow around to get it into a perfect placement doing it this way.  

Hopefully that made sense, I forgot to take photos of the bow making process when I was working on this for my daughter's birthday.  All those late night crafting sessions when she was in bed to keep things secret don't lend well to remembering things lol 

This week is crazy busy with dance but its also a lot of fun.  Looking forward to watching her studio's end of the year shows! 


She loves her little owl and we named her Anna Bella :)

Monday, May 21, 2012

Crochet Pattern: American Girl Shawl/Wrap


Today is going to be a quick post since I am under the weather....again! Sinus infections are no joke! lol 
I wanted to get this pattern posted since a few people messaged me about it and wanted to know when I would be posting the pattern. :)

American Girl Crochet Shawl/Wrap Pattern
Inspired by the Claudia Scarf Pattern
You can make and sell things from this pattern but please make sure to link back to me if you blog about it. 

What you will need:
A small amount of yarn
A button of your choosing 
Needle and thread for sewing on the button
Yarn needle for weaving in ends
A 5.00mm hook or hook needed to obtain the gauge. 

US Crochet Terms
sk {skip}
dc {double crochet}
ch {chain}


The blue one is done in Naturally Caron Spa and the pink one is done in two strands of baby yarn held together at the same time.  Blue shawl/wrap measures about 15.5 inches wide by 3.5 inches from top to tip of shell.  The pink and white one measures about 16.5 inches by 4.5 inches from top to tip of shell.  After working your first row, you will want to measure your piece to make sure its between 15.5in - 16.5 inches to check your gauge.  If you are off a tad just adjust your hook accordingly. :)


With your 5.00 mm hook and your yarn {one strand or two} you will ch 58.

Row 1
5 dc in the 7th ch from the hook, sk 2
* dc in the next, sk 2, 5 dc in the next, sk 2 *
Repeat from * to * until you get to the last ch and then work 1 dc in that last ch space. 

Row 2
Turn 
ch 4, work 5 dc into the 3rd dc of the 5 dc cluster from the previous row, ch 1
* dc in the previous dc, ch 1, 5 dc in the 3rd dc of the 5 dc cluster, ch 1*
repeat from * to * ending with 1 dc in the ch 4 space of your beginning 6 skipped chains from row 1

Rows 3 - 6
Turn 
ch 4, work 5 dc into the 3rd dc of the 5 dc cluster from the previous row, ch 1
* dc in the previous dc, ch 1, 5 dc in the 3rd dc of the 5 dc cluster, ch 1*
repeat from * to * ending with 1 dc in the last stitch space. You will always end your rows with 1 dc. 

Secure your ends and weave them in with your yarn needle. 


You will want to sew your button onto a 5dc cluster so that it lines up with the hole from a 5 dc cluster on the opposite side.  See photo above to see what hole I am talking about. The arrow is pointing to the hole under the one I used for my button hole but hopefully you can see what I am talking about. :)  This way you can use that hole from your 5 dc cluster as your button hole instead of trying to work a button hole into the pattern. If you use a smaller button like I did, it fits great and keeps it secure on your doll, which is perfect for doll playing fun. 

After you sew on your button and weave in any stray thread ends you are finished! These work up very fast and easy, perfect gifts for little girls who love their dolls.  You could even customize this by making it bigger to fit waldrof dolls or any other doll your little one has. :)  

If you make one I would love to see the finished product! 

Off to get some rest before we are off to ballet :)

Linking up to Frontier Dreams Keep Calm Craft On.  Head on over there to check out some more crafty goodness!


Tuesday, May 15, 2012

Crochet Pattern: Newborn Baby Tiara

I was asked last week to rework my Little Girl Crochet Tiara Pattern into a newborn size.  Now when I am working up sizes I usually like to try them on the person or thing it is going to be for to insure a perfect fit.  For this pattern I was out of luck in that department since I don't have a newborn baby in the house.  


This is the Little Girl/American Girl Doll Version. 
American Girl Doll Version here. 

{Pattern after the photos)
When I went to make the newborn version I knew it would end up being a play prop for my daughter when she was playing with her dolls and dressing them up.  I went ahead and let her pick out the colors and tell me how she wanted it since it would be for her.  

She picked out two yarns, a purple and a yellow that look really cute together.  I upped the hook size as well because she said that she wanted a "super big sized" crown for her baby doll. :) 


My daughter loves the goofy look on her baby's face.  She got this doll back when she was about two and its held up pretty well, she takes really good care of her dolls and toys. :) 


It even fits her cabbage patch kid...I used to love those dolls myself growing up.  We got her this one back when she was really little.  I went looking and looking for a doll that looked like her since there are so many versions of the cabbage patch dolls.  This was the closest I could get at the time.  My daughter says it looks more like me than her since my hair is black so she calls this one baby bella :) 

Victoria wants to go ahead and sew the beads to this crown herself.  She is hoping to get that done this weekend.  :)


American Girl Crochet Tiara Pattern
US Crochet Terms

What you need:

6.50 hook 

Worsted yarn {I like a soft but not too soft yarn}
You will need to balls because you will be crocheting with two strands at the same time. 

Yarn needle for weaving ends

Beads or other embellishments 

Needle and thread for sewing on beads and embellishments. 


Ch 29

Row 1
sc in the second chain from the hook and sc across till the end

Row 2
Turn
ch 2
skip 2 stitches
work 1 dc in the next, cross in front of the dc you just made and work a dc in the 2nd skipped stitch of this row
* skip 1, work 1 dc in the next, cross over that dc and make a dc in the skipped stitch *
Repeat that pattern until you have 2 stitches left. 
skip 1 and then dc in the last 

Row 3
Turn
ch 1
1 sc in the 1st space created from the previous row's crossed dc stitches {this will be in between your last dc of the row and the last crossed dc pair of the row
work 1 dc, 4 tr, 1 dc in the next space
* work 1 sc in the next space & 1 dc, 4 tr, 1 dc in the next space *
Repeat this pattern across ending with a sc in the last space. 

Finishing
Secure your yarn, weave in your ends and embellish to your hearts content! 

My daughter worked up the ties by chaining, you can see how she did that from our previous post on these crowns here. 

If you make one of these and find that its too big or two small please let me know so I can make adjustments.  Like I said earlier, I don't have a newborn baby to try this on to so I am working on my sizes based on my daughter's baby dolls. 

Monday, May 14, 2012

Crochet a Mini Bear

After my first amigurumi attempt a few weeks back I was feeling pretty confident to try a more difficult piece....I knew it would be kinda hard but I had no clue just how hard it would be! lol

Most of my crochet work has been clothes, blankets, headbands, flowers and that sort of thing.  Some joining and sewing together was involved but nothing to the degree of creating a 3D piece.

As I was picking a piece I thought, start small because it will work up faster and probably be easier.  Boy was I wrong! lol Mind you, to some people these smaller toys might be a breeze, for me I def. struggled and learned a lot about patience along the way. ;)


Tiny Amigurumi Bear Pattern Found here. 
If I could have a do over I would def. fix the way the nose came out.  When I first sewed it onto the muzzle piece it looked find, cute even.  But when I went to sew it on the face it pulled a bit as I was sewing it down and I think that stretched it a tad to where it now looks a little wonky.  The other thing I would fix is not to squeeze down on her little belly too much when attaching the pieces because it created a slight little dent in her.  


I was able to finish this project up in a day, it truly works up fast....it was just the sewing the pieces together that threw me for a bit of a loop. 


To show just how small Veronica {my daughter named her new little friend before she as even finished!} is I  took this photo of her in my almost nine year old's hands. She is so tinny!! 

My daughter loved her, imperfections and all.  She kept saying how cute she was as I was working on her and sat with me while I worked her up, constantly telling me how excited she was about her new little buddy.  It was really quite sweet. :)  Even though I would change a few things about how she came out I still think for my first ever multi piece amigurumi she came out pretty good if I do say so myself. :) 


Two weeks ago there was tryouts at my daughter's ballet studio.  They have these groups you can try out for ...teams for lack of a better word.  They do more performing than the basic classes do, have special choreography classes, special performances, and they go to a competition in the spring.  She was on the team this year and really wanted to do it again for this coming dance season. I got the email late at night that she has been accepted and decorated her little Veronica to tell her the news in the morning.  She got up that morning and little Veronica was sitting next to her plate waiting to share the news. :)  Needless to say there was a lot of squealing and jumping up and down that morning. 

Tomorrow I am hoping to share a mini tutorial as to how I did the floating balloons for this little display.  
Today we are going to try and get some schooling done....try being the main word there.  Little miss and I have horrible allergies right now and can barely talk so today will def. be a quiet day.

Floating Balloons Mini Tutorial can be found here. 

Hoping everyone had a wonderful Mother's Day weekend! :)

As I re read this post to double check for spelling mistakes and such I couldn't help but thing just how cute these would be as stocking stuffers for the holidays or even party favors for a birthday. The work up really fast and to someone who is more experience in amigurumi they are probably a breeze :)

Monday, May 7, 2012

Getting Sneaky with Birthday Presents

As a homeschooling mom who loved handmade gifting, I find that I hit a little snag when it comes to gifts for my daughter.  Since she is home all day with me and I am pretty tired come 8:00 when she is in bed I have to find ways to get creative with how and when I can make her gifts.

Take this adorable hat I just finished.

She thinks I made this for my friend's little girl....when in reality it is for her birthday all along.  She fell in love with this hat pattern when I made it for my other friends little girl and kept saying how much she wanted one too.  I decided then and there to work one up for her for her birthday but needed a way to do it without her knowing.  So I asked her to design a hat that a girl her age would love under the pretext that it would be for my friend's daughter, I know some people might gasp at that BUT I want her to be surprised with her gifts so I had to think of something that she would believe and still be able to try it on her without her asking too many questions.   I had her pick out the yarn, the colors, and the buttons.  She knows this little girl is a lot like her so I told her to just pick something she would love because we both knew that little girl would love that too. :)  

I wanted to add two more rows to the hat but my daughter liked it the way it was because if she tilts it back, a little more of her forehead is exposed and if she wears it like this its a shorter hat.  Since it was going to be for her, I let her call the shots on it. I am going to make another one with the called for hook for her to wear for Christmas photos {I am making one for me as well}, that way it will have the more retro vintage cloche feel. 


Pattern for the hat can be found here. 

I worked up the child size but used a 4.00 hook and took out the last two rows.  I did this because A.  I knew my daughter was looking for a hat that fit snug but not too snug that she could not pin back the top part of her hair to get it out of her face when wearing this hat.  B. She told me she wanted it to be shorter and more loose fitting as I was trying it on her as I worked it up. She loves the way it fits and told me after trying it on and snapping a few quick pics {which is totally normal because I like to take photos of all my projects} that she wanted a hat that fit/looked just like this. 

I guess its her lucky day because in a few short weeks this hat will be all hers. :)

This hat pattern works up super quick and on the web posting their are directions for many sizes.  Perfect for family photos or quick and easy holiday/birthday gifts. 


Thursday, May 3, 2012

Finding Balance & Some Awesome Free Crochet Patterns: Mother's Day & Baby Shower

Lately I have had so much going on with my daughter and working on projects for her upcoming birthday {still can't believe she is going to be nine!!} that I almost feel like things are in a little bit of a blur.  Schooling, Ballet, Crocheting, Crafting, Cooking, Housework, Garden.......I need about three more hours in a day and then I would be set. :)

To be able to get it all done {well most of it anyways! lol} I have found myself making daily lists in my planner, reasonable ones of what I need to get done that day.  Esp with all my projects for my daughter's birthday, she wanted a lot of handmade stuff, I know I won't be able to get to it all so I picked a few of her favorites and then mapped them out in my planner so I know how much I need to do of each project to be done in time for her big day.  At first I thought I was being a little  okay a lot of an obsessive over planner but you know what? It has helped so much and I find that with a more structured daily plan I am getting so much more done than before.  I don't know why this light bulb didn't go off sooner since our schooling has structure and daily plans.  The important part, the light bulb went off and its working fabulously!

Are you still looking for the perfect Mother's Day gift? Look no further, this pattern is awesome and works up so fast and easy!


I worked this one up in a soft bamboo yarn, is deliciously awesome yarn! I want  need a blanket made out of this yarn some day! Pattern can be found for free here. 

Spring for me seems like baby central....lots of birthdays for wee ones and lots of new babies being welcomed into the world. I stumbled across this pattern awhile back and fell in love! I worked one up for my friend's little girl who will be one in May.  I made it a little bigger by using a 4.00 hook.  The mom tells me her daughter's head is a little bigger than average and I knew she would not be wearing it until late fall/winter/spring so I wanted to make sure there was def. room to grow. :)


The textures in this hat are fabulously vintage! 


My daughter wanted to help, so I had her pick out the button for the middle, she was thrilled to be able to do that and get to be a part of this gift for our friend's little girl. The girls share the same birthday and Victoria thinks that's pretty cool. :)


And because its fun to share, I thought I would add in two other favorite things from this past week.  These awesome vintage canisters {glass} from 1975 that I just absolutely love and my new business cards.  I also ordered cards to attach to my finished pieces that I sell or gift so that people will know how to care for their items best. I love the fun whimsical print on them! 


Hopefully everyone is having a fun and productive week! What are you guys working on? :)


Friday, April 20, 2012

Crochet Pattern: American Girl Tiara

Earlier this week I did a post on tiaras for a little girl, pattern and photos can be found here.

My daughter loved how the kid size tiaras came out and wanted her doll Kit to have a matching one for her big day next month.  I love that she still likes to do the matching thing with her dolls and comes up with her own ideas and projects for things.  Its so neat to watch their creative minds at work. :)


For the back I took two long pieces of ribbon and then on each side I put it through the gap right next to either the ch 2 or the double crochet {depending on the side} and then pulled it through about two inches or so. Then I folded it over and hot glued the 2 inch folded onto the the long piece of ribbon.  This way it wrapped around either the ch 2 or the dc to keep it secure to the tiara. 


American Girl Crochet Tiara Pattern
US Crochet Terms

What you need:

5.50 hook 

Worsted yarn {I like a soft but not too soft yarn}

Yarn needle for weaving ends

Beads or other embellishments 

Needle and thread for sewing on beads and embellishments. 


Ch 23

Row 1
sc in the second chain from the hook and sc across till the end

Row 2
Turn
ch 2
skip 2 stitches
work 1 dc in the next, cross in front of the dc you just made and work a dc in the 2nd skipped stitch of this row
* skip 1, work 1 dc in the next, cross over that dc and make a dc in the skipped stitch *
Repeat that pattern until you have 2 stitches left. 
skip 1 and then dc in the last 

Row 3
Turn
ch 1
1 sc in the 1st space created from the previous row's crossed dc stitches {this will be in between your last dc of the row and the last crossed dc pair of the row
work 1 dc, 4 tr, 1 dc in the next space
* work 1 sc in the next space & 1 dc, 4 tr, 1 dc in the next space *
Repeat this pattern across ending with a your 1 dc, 4 tr, 1 dc cluster in the last space and then a sc in the top of the ch 2 from the previous round.

Finishing
Secure your yarn, weave in your ends and embellish to your hearts content! 


My daughter loved the one that I did and she sewed the beads on so much that she wanted to give it a try as well.  The cross double crochets were a little hard for her at first but she mastered it so quickly and was able to finish it off easy peasy. 


I love how adorable hers came out! 

Today I am linking up to The Magic Onions Friday Nature Table


Monday, April 16, 2012

Inspiring Crafting with Kids

Most days when I am crocheting or crafting my trusty partner in crime aka my little one is right there along side me....watching me....asking questions....and making me laugh.  I love that she loves to sit with me while I crochet or craft and just have some quiet time just the two of us.  Some of my most favorite spring memories this year are her and I sitting in her bed crocheting and chatting.  Its so much fun to sit with her and enjoy peace and quiet, special moments, and a love for creating.

The older she gets and the more she learns, she wants to make the same things that I am doing.  Its really quite cute. So when it came to making tiaras this weekend, I knew that she would want to make her very own from start to finish just to see if she could.  We make a birthday crown for her each year together....this year was no exception.  But she did want to go a step further and try and make her very own, something that was all her.  I find that she not only adores and loves things her and I have make together but she also shares and equally but different love and joy for something that is all her...its written all over her face while she is working to when she is finished. Priceless.


This weekend we made quite a few tiaras for little girls and dolls.  It was so much fun chatting away while we worked...didn't really feel like work at all with someone so fun to craft with. :)


After mastering sewing on the beads and hiding her threads she was ready to make one of her own.  She wanted to start small so I taught her the American Girl Version of the kids tiara and she was off.  The only part that was hard for her was the cross double crochet stitches in Row 2 but once she got it she was finished in no time. Girls Tiara Pattern can be found on my blog here.  American Girl Version will be in a post later this week. :)


Instead of doing ribbon or lace she took a soft wool yarn and did long chains for the ties.  She tied them to the tiara where you would glue the ribbons around on the big girl version. 


She then made herself matching ties for one of the ones for her.  After we were done we realized we had two for her....one with the crocheted lace and this one that she did the chains for the ties. I asked her what she was going to do with two and she told me, "You can wear one on my birthday and I can wear one too and then we will be matching princesses!" Adorableness ....that is what she radiates. :)  I can't wait till her big day, where her and I can wear our matching tiaras together! 


My favorite photo from the afternoon, her in her tiara with Kit in the one she made. 


Its the little things in life.....like watching your child learn and grow before you eyes and create beautiful things. <3

Back to working on hats for upcoming birthdays :)


I'm linking up today to Frontier Dreams Keep Calm Craft On.