Sunday, July 7, 2013

Healthy Tuna Salad Recipe


Because of the insane heat we are having, I am on the lookout for fast and easy recipes that don't require a lot of cooking time in the kitchen so I don't warm the house too much.  I saw a photo of cooked tomatoes and tuna on Pinterest a few days ago that was a user upload but had no recipe and looked like it could be a good dinner/lunch option. I decided to take the photo as inspiration and then go from there, the results were super yummy and this dish is def. a new favorite in our house. 


Tuna Salad
3 big or 4 small/med servings 

Ingredients: 

15 ounces of all white tuna ( 3 cans )
Extra Virgin Olive Oil (EVOO)
The juice of 1 whole lemon 
2 small cucumbers quartered and chopped 
3 - 4  Roma tomatoes with the insides taken out and chopped 
Green beans or another veggie to serve it with (this would also be fab over rice or on a mixed green salad)

Spices to taste: 
Salt, Pepper, Garlic or Garlic Powder, Onion Powder or some fresh diced onions, Chili Powder 

Cooking: 

Cook the tuna in a pan with EVOO and the seasonings to taste over medium heat.  I just slowly added the seasonings and tasted it every once in awhile to make sure I got the flavor the way I wanted. You want to just add enough EVOO to keep the tuna moist so it does not dry out so start with 2TBS and add more as needed.  Once the tuna is warm and you are happy with the flavor of the seasoning add in the lemon juice, cucumbers and tomatoes.  Now we are a lemon loving family so you might want to start out with 1/2 or 3/4 of the lemon juice in case you are not lemon obsessed like us. ;)  Cook for another min or so until the produce you added is warmed and you are happy with the flavor.  Serve over rice or with a green veggie for added healthiness. This would also be great cold the next day over a salad or eaten as is with some fruit on the side. 

If you make this and try any adjustments or variations I would love to hear them! I think this is one of those dishes that can be modified many ways to make new delicious and healthy meals. :)


Tuesday, June 11, 2013

Rainbow Loom Bracelets


Have you seen kids out in town or at school with bracelets like this?  Most likely they are into the newest craze that is becoming popular over here....Rainbow Looms.  Normally I don't buy into the new latest and greatest thing or fads but little miss had her own money and since it was a crafting project that could keep her busy on the hot summer days I said okay.  She has been having a blast the past week making tons of bracelets for herself, her friends, and family. It was a great purchase that I am sure she will get a lot of joy out of learning all the different ways to make bracelets and making up her own versions. :)

You can visit the Rainbow Loom website here if you want to learn more about it.  Amazon sells the kits as does Learning Express....I have found that they are half the price at Learning Express so before you buy them off of Amazon check your local stores to see if  they carry them. 
{ Rainbow Loom is not paying me anything for this post ....I am merely sharing a great crafting tool that my daughter and her friends have all fallen in love with. } 


You use these small rubber bands, a hook, and a loom to create your awesome accessories. 


Beating the heat this weekend with bracelet making at the kitchen table.  Instead of running all of our inside lights we will put a bright lamp on the table for crafting to keep the heat of the house down as well as the energy bill low when its 110 degrees outside and the ac is running like crazy. 


The booklet that comes with the kit teaches you how to make single ones first. 
We have quite a few of those around the house right now....at least 15 or so at my last count lol 


When you get the hang of how to work the loom and the hook you can move onto more advanced patterns. 
Triple Single Pattern Pictured Above 

Video for the Triple Single Pattern here


Love the texture in this one! 
This is the Liberty Twist Pattern, video tutorial can be found here. 


This pattern is the Single Rhombus and can be found here.


Now that my daughter has gotten the hang of this and understands how the patterns work she has begun to try and make her own designs. :) 


These bracelets are great for summer, colorful and fun and can get wet with no problem :) 

If you have kids who love to make handmade gifts for friends and family these are perfect because they are something they can do on their own from start to finish and can show their creativity in each piece. 

Tons of video tutorials for the loom and mini loom found here. 


Tissue Paper Glass Jar Luminaries

Crafts that allow us to reuse items that would otherwise be recycled or thrown away are a win win in our house.  I like to save glass jars from everyday things we might buy, condiments, sauces, pickles, ect.....you never know when they might come in handy for a craft project on a really hot { or rainy or cold } day.


Tissue Paper Luminaries 

What you will need:

clean and empty glass jars { no labels }
tissue paper { the thin solid color ones work best but they are delicate to work with }
scissors 
mod podge 
containers for tracing if you want to have certain shapes cut out 
Paint brushes { to apply the mod podge }
small candles or tea lights 
lighter { to light your candles }

Step 1:
Pick out your colors and figure out what design you want to have on your jar. 
Cut out the pieces you will need. 

Step 2:
Spread a little bit of mod podge on the jar at a time and place your tissue paper onto it patting it down.  Try not to rub the tissue paper down because this can cause it to tear.  Also, you don't need a ton of mod podge to get the tissue paper to stick down, too much and the tissue paper can tear, wrinkle, or become a squished mess because it will get over saturated. 
Finish applying all of your tissue paper to your jar. 

Step 3:
Allow your jar to dry for about 10 mins or so and then apply mod podge over all of the tissue paper to seal it down.  You want to wait to do this because if the tissue paper gets too saturated with mod podge it can cause it to tear or crinkle on the jar. 

Allow your jars to dry all of the way before handling and placing a tea light into the jar. 


Bonus points to the people who can tell me what character the middle jar is made to look like. ;) 


My daughter loves having her jar in her room at night all aglow.  Like me, she is a lover of candles and candle light. :)

Have left over jars in your home? You can turn them into fun luminaries for every day display or you can make seasonal ones like we did a few Halloweens back: 


Thursday, June 6, 2013

Tin Can Luminaries

Looking to beat some of the summer heat already? 
Where we live the heat is in full effect and I am not loving it  lol

With the heat taking over, it means lots of inside afternoon activities so we can stay as cool as possible.  

Tin Can Luminaries are a fun and easy project to do on a rainy day, a hot day, or any day you feel like getting your crafting on with your kids. 

I followed the tutorial here to make these with the family. 
{ We didn't paint ours because I like the silver metal look of the cans }


After punching the holes in the tin cans you can just place them outside on a hot { or warm day } and let mother nature melt the ice for you. :)

Mine did not come out right and ended up a hot mess, so I will have to give it another try once we have a few more cans.  I need to remember simple is better when punching the holes. These are my daughter's and my husband's luminaries. 


They came out pretty cute when we placed candles in them.  
Yes we are Zelda lovers in our house. ;) 


My daughter's look so sweet in her room all aglow as she falls asleep. :)

I want to make some more of these for the house .....they are a fun eco friendly craft that you could make for different holidays or themes to pull out as some sweet handmade decor made by you and your family. 

PS Instagram photos and blogging go beautifully together and make the whole blogging experience run so much smoother, so thankful for that! :)


Tuesday, June 4, 2013

Cold Bean + Tomato + Corn Salad {or salsa for your chips!} Gluten Free

As the weeks go by and I get back into blogging occasionally you will prob. notice a slight shift in my content. I will still be posting about crocheting and crafting but will also be including gluten free {GF} recipes I have made or tried, and homeschooling posts as well.

I love pinterest and finding new crafting DIY's, recipes, patterns, ect.... BUT I also love to see how other peoples attempts at projects and recipes come out.  Reviews are a big selling point for me....to see if its easy, any issues people had, modifications I might like, ect. So most recipes on here will be ones that I have tried or modified versions of other peoples GF recipes. I might try and get brave once I have settled into the GF lifestyle a bit and make my own.  For now, I am quite content trying other people's fabulous recipes. ;)


Cold Bean + Tomato + Corn Salad {or salsa!}
Recipe From: Scaling Back
Full Recipe found here.

To make this GF just make sure any ingred. used are GF, for this one its the vinaigrette ingredients that you will need to double check. 

I have to say...this is a really satisfying dish and can be served as a side with more veggies or maybe some fish or chicken or bring it to a party with a bag of your fav. tortilla chips and watch it get devoured. 


The two times I have made this dish I have doubled it so that we can have leftovers. 
I have made it with all black beans and then another time with one can of black beans and one can of dark red kidney beans.....both were equally delish! :) 

I like to add in three types of tomatoes, the small red and yellow ones and also a few romas as well. 


My daughter and I are just getting into the avocado love so I put it on the side to add in at your own preference amount. This is a great dish to prep ahead of time leaving the vinaigrette to add on till right before you eat it, making those nights where you get home kinda late a little easier in the dinner department. 

This will def. become a staple in our house in the easy go to dinner department. With so many ways this can be adapted I am looking forward to lots of satisfying and healthy cold salads to help beat the heat this summer. 

Friday, May 31, 2013

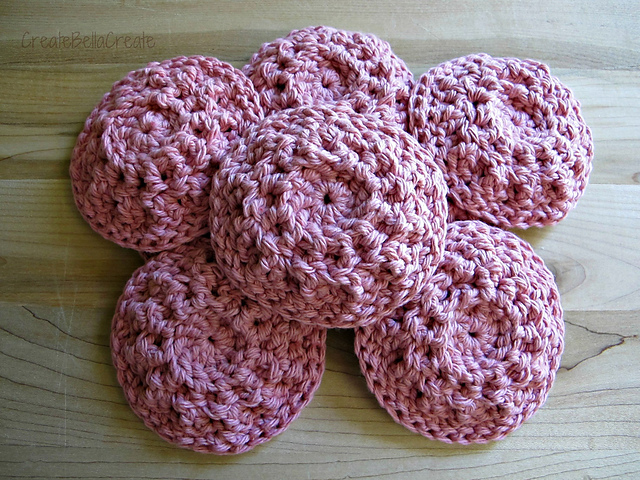
End of the year Teacher Gift {Face Scrubbies}

Are you a crochet lover { and possible addict ;) } looking for a quick and easy teacher gift for end of the year?  I have the perfect gift that works up fast and easy and also uses minimal yarn.


A set of handmade all cotton face scrubbies that are fabulous to use and eco friendly too! :)
{Scroll down for pattern link}

I have made two sets for myself and multiple sets as gifts and everyone always loves them.  They are great for washing your face in the morning or cleaning make up off your face at night.  Throw them in the washing machine with your towels {I throw my in the sanitary setting on my front loader with my towels} and then you can lay them flat to dry or throw them in with another load to dry {I always throw them in on the delicate cycle to avoid shrinking}.  They do curl up a bit after washing but as soon as you get them wet they are flat and back to their normal size and shape.


The texture is fabulous on these, one side is more bumpy than the other, so depending on what kind of texture you are looking for you have two options with these. 


Sorry for all the photos....
I am in love with this sea foam green color, it looks even more fab in person too! 
I want to paint a room in my house this color...or maybe just buy a dress in it. ;) 

The pattern is available for free on Ravelry here and if you want my notes with the yarn info you can see that here

I like to keep my packaging simple and sweet, use some vintage lace to tie them up in a cute little bundle and add a card to your shop or a sweet little note.  These beauties are bound to be loved for many months to come and mother earth will thank you for helping to keep the planet a little more green. :)


Tuesday, May 28, 2013

Stained Glass Art Project {a project for any art lover!}

After a three day long craft fest with my little one, the creative spirit in me feels happy and satisfied .... BUT also itching to do more. ;)  I am hoping to have time this week and the next to share a few of my favorite projects we did.  :)

First up, the faux stained glass art project!


What You Need:

Clear contact paper
Pencil and Eraser 
Black Sharpie Marker 
Colored Pencils 
Scissors
A bowl if you want a round finished product 


These projects are simple and easy, great for sitting at the table and bonding with the kids or for keeping a group of kids busy and having fun. :)

1. Plan out what you want to draw.  If you want a round shape, now is the time to trace the size bowl you want on your contact paper.  
2.  Draw out your drawing using a pencil, keeping in mind that you don't want to press too hard so that the pencil lines {when traced over or erased} don't show through on your finished piece. 
3.  Once your drawing is finished, trace it carefully with a black{or any color of your choosing} permanent sharpie marker. Erase any stray pencil marks.
4.  Color in your drawing with colored pencils.  Keep in mind the colors do look lighter when the finished product is placed in the window.  So if you want your colors as vibrant as possible, its best to press kinda hard. ;)
5.  Once you are finished with your drawing, cut it out and carefully place it onto your window.  I found the best way to do this was to peel from the top and once I had a small section peeled away I placed that onto the window, smoothed it down and then slowly peeled more off....smoothing it down as I went. 


Depending on the time of day and/or how the sun hits it, the colors in your project will be more vibrant or faded.  I love the way the look in the windows and the extra personal touch they bring to a room.  My daughter's owl one makes me smile .....I know its hard to see in the photos but she used multiple colors in each section to blend them to get her colors "just right and more fancy".  I love watching her inner artist bloom and her creativity blossom.  

I have a feeling that by the end of the summer, most of the windows in my house will have one of these on them. :)